Archive 19/01/2023.

Character creation/customization system

slapin

Hi, all!
Have anybody done character creation systems based on morphs?
Like ability to set height for character, leg size, face features, etc.
What is required to do so? I know I can make morph target (shape key) for each change needed,
but I see that some changes to skeleton are required, is there some articles on topic to
look into, or examples, or anything? I don’t need anything fancy, something average should do.

I know I can use bones to set basic macro parameters like height, arms/legs size, etc. but these
do affect a lot and require some complex calculations to look right. I knwo tweaking these I eventually can get
to right direction, but I hope somebody did this and could tell about how to do it properly from start.

johnnycable

http://www.manuelbastioni.com/index.php

http://blog.machinimatrix.org/2015/12/17/avastar-2/

http://www.geocities.jp/higuchuu4/index_e.htm

http://www.tombraiderforums.com/showthread.php?t=147100

these are free ones. Of course, if you want you can shop for iclone character generator / daz 3d / poser, for some ready made content.

And obviously Maya / Max has rigging, animations…

slapin

Well, these are already completed character generators (you forgot makehuman btw).
Thanks for the links.
I want to do in-game character generator and trying to guess what is needed to do that…
The reason for doing it in game - character customization is fun for player. Also, if NPCs look diffrent
game feels more diverse and look better. I’m aware of some commercial systems in Unity,
but I want to make my own, but I have not enough knowledge to make this effectively yet…

johnnycable

What about starting with a base? that is, a master model?

slapin

Also the license for Manuel Bastioni Lab meshes is AGPL, which might not suit all.
Makehuman with CC0 license is much preferred as generator tool.

slapin

Yes, I start with base, and I already can change general height and arm/leg lengths.
This is already not trivial, as I need to compensate proportions. These all changes are skeleton-based
(I just scale bones).
I’ve got a feeling that I’m reinventing the wheel and in not most efficient way. I need some insight
from more experienced people.

slapin

And no, I don’t want to go too far with it now, but I need to understand I can get hight level of flexibility
if I need to be.
My current list of required features:

Macro:
height
torso size (proportional)
legs size (proportional)
arms size (proportional)
head size (proportional)

Micro:
eyes size (height/width)
eye position (vertical)
eye slant
nose size (width/height)
nose position (vertical)
mouth size (width/height)
mouth position (vertical)

I use face rig, so the above changes require morph + bone changes, as I can’t get good results
with just bone pose…

So I basically need to find a system to do such changes, which I could extend as I need…

lezak

It looks like You have all pieces that are needed for character customization:

  • base model (rigged);
  • softwere for defining morphs (shape keys in blender)
  • animated model class with setmorphweight in Urho
    Just put them together and find right configurations.
    Also it may be a good idea to have some non deform bones (I dont’t know how it’s called in other softwere then blender) responsible for animations with child deform bones responsible for customizations (non animated). For example, to control eyes position and scalling this setup should work:
  • “head bone” - non deform, used in animations but doesn’t directly affect verticies of model. This bone is parent to:
    • eye bones - deform bones, non animated - they will be moved by parent “head bone”. Since they are deform bones You can manipulate eyes position by moving them or eyes size by scaling them (of course You will need good bone weight setup) without affecting animations.
Mike

I think the way to go is to store a map between bone name and 4 vertices id that define bone position (you could use edge loops would you need more accuracy). This could be easily exported from Blender.

Then after applying the morph in Urho3D, which can stretch or shorten the limbs in non linear fashion, modify skeleton based on new vertices positions. That way the skeleton will “follow” the mesh.

Alternatively, if you’re using some morph targets, you could store bone length with full morph applied and modify skeleton based on fractional weight applied.

slapin

@Mike thanks a lot for explanation. I see that makehuman uses vertice markers which are stored with mesh,
looks like way to go. But it looks like the same morph needs to be applied to clothes meshes, which makes
the whole thing a bit more complicated…

@lezak - a problem is that I need different pieces of clothing (and naked) applied to the same
character, so it looks like somehow the morph needs to produce the same effect on all meshes
for animation to work properly…

Makehuman uses clothes helpers for this, but I don’t really understand how this works.
Probably some form of weight transform, or distance-based…

Mike

Makehuman (and certainly every other app) maps each cloth vertice to character nearest vertice, which ensures that clothes tightly fit the character, without poking (this was explained in old MH tutorials).
The map is exported by MakeClothes .

johnnycable

Manuel Bastion is AGPL for the code part, the models you generate for your use are CC-BY.
The tool is intended for creating a master model the way you want.
By the way, @Mike , the character lab sports an automatic proxy fitter while make clothes need adjusting weights manually… much more time consuming and error prone.
Looks like Manuel Bastioni has been a long-time contributor to MakeHuman…

slapin

Manuel stopped activity a few years ago and left about 2 years ago.
Basically Makehuman stagnated since about 2013 or so. But the software itself is quite stable
and very usable.

Also I find workflow in Manuel Bastioni Lab more complex, and I can’t find any support for clothing
(and for hair either). Also face handling is quite primitive requiring lots of morphs and no rig.
I’d follow the project but now it is 100 years to have Makehuman features.
I wish them both success though, having both will benefit users.
However Manuel’s license is not really nice for OSS products wishing
permissive licenses:
http://www.manuelbastioni.com/guide_license.php
As CC-BY is intended only for closed source works, all the rest have to use AGPL3.

But that is really not what I want to discuss here - I want techniques,
not external character generator products.

johnnycable

I see. By the way, what about a morphing library?
I didn’t inquire into that, I must remember to check…

slapin

What about morphing library? I don’t think I need it as Urho supports morph targets.

slapin

Well, I see some problems with marker approach.

I have no problems setting origin of bone transform and it works fine. The problem is tip placement.
As Urho does not care about bone tips, there’s no way to have rotational data for all bones using markers.
Or do I miss something?

Well, bone bounding boxes are all messed up in my skeletons (due to limitation
of exporter probably) so I have to rebuild them to prevent crashes in debug build of Urho, but that is another story,
so if I have proper bounding boxes, could they help me to calculate bone tips?

I need to have bone tips to calculate rotation changes in bones. Or is there another approach?

lezak

I’ve never tried it but having same/similar shape keys on several meshes should be easily achived in blender by merging all meshes into one and then using sculpt mode to make shape keys (propably there will be to many verticies to do something in edit mode). After that just seperete meshes, do some tweaking and You should have similar effects on all of them.

Modanung

How about proportional editing (toggled with O )?

Couldn’t you use layered one-frame animations for the scaling of the bones? Exporting only the scale for those and not in multi-frame animations.

slapin

Well, I believe more in generated maps, a problem is to make all shape keys to be similar,
that all looks too complicated…

suncaller

For best effect on a humanoid character generator, I would personally create multiple geometries based first on gender, then age, and then body type. Create the appropriate morphs for each of these geometries. Modify the base skeleton according to the necessary animation sets, and finally in-engine smoothly blend between drastic changes in height or girth.

It’s a lot of work, but you seem to have most of what you need

slapin

Well, it looks an additional problem I have is that I need to have base mesh split due to bone per mesh limitation.
And all that have to be done in engine. It all looks like real challenge. I’d really like if I complete this task
to have some core subsystem for this for others to have easier path next time…

suncaller

For a character creator you generally do need to split the meshes. I think there’s a GDC talk on youtube about Bungee’s approach for Destiny.

slapin

Could you please provide direct link? For some reason I can’t find anything meaningful about
Bungee’s Destiny which would relate to the topic…

suncaller

I saw it a while back, and my flash player at work is disabled so I can’t be sure this is the one, but the title sounds right: http://www.gdcvault.com/play/1020412/Building-Customizable-Characters-for-Bungie . If I remember correctly, it’s a high level talk from a tooling/asset creation perspective. Not sure how useful it will be to you.

Sinoid

Have anybody done character creation systems based on morphs?

Sort of, I use morphs as control shapes for the sub-meshes of an aggregate, cooking the morphs down before the final CSG or merge-independent steps.


There isn’t that much out there since it’s all just the same stuff as the usual mesh-pipeline with sources/application changed around.

Brad Stokan’s “Ultimate Customization” slides - very hand-wavey, but also detailed enough that the full talk isn’t even needed.

Slides from some random lecture - not actually that useful but is less hand-wavey.

Adaptive Clothing in Kingdom Come , work-load reduction in layered materials.

Maskle , while intended for facial animation it can just as well be used for a control-rig similar to cages.

Any Signed-distance field or distortion function can be used for manipulating vertices, some more coherently than others (the bramble is interesting ).


Destiny’s tools are built around Maya and XRefs (in FBX), and tied into their task-graph system.

That same general approach goes back at least as far as Hellgate: London as I recall some slides from nVidia on the texture packing and budgets for each character.

slapin

Well, I geve the whole idea some thought and see the following picture.

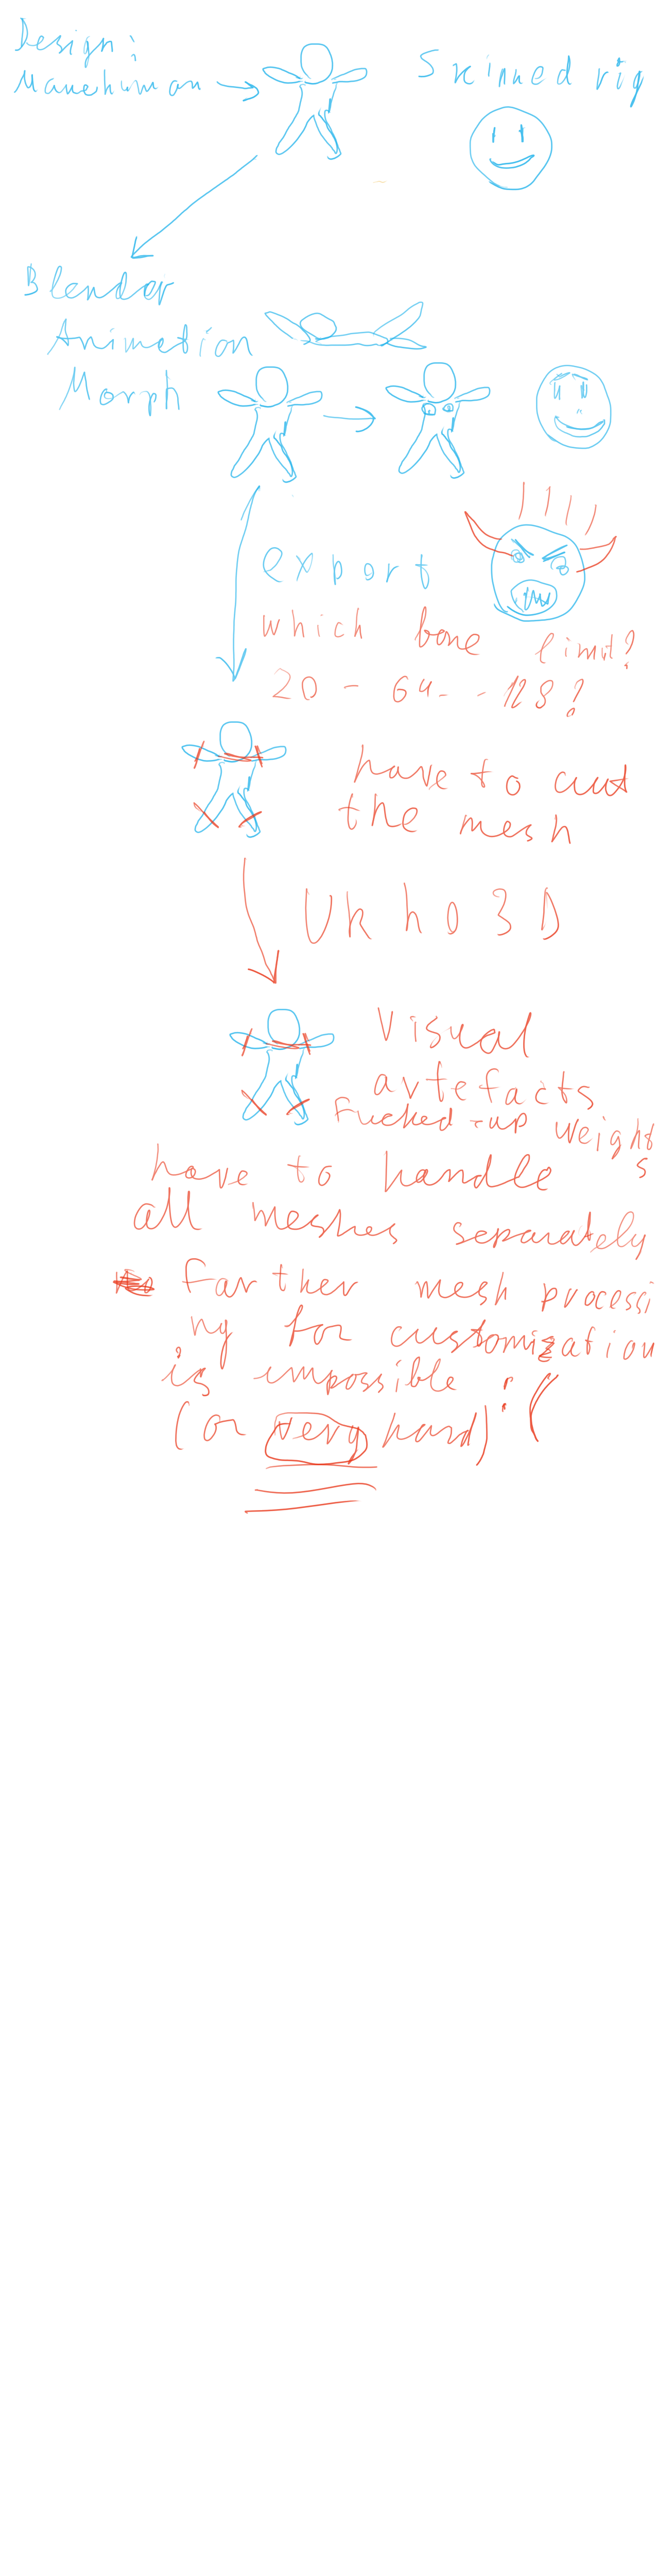
  1. In Blender I compose all model as whole (Blender is bad at splitting things and keeping normals intact)
    I compose all required morphs directly on model.
  2. I split model either during export or in engine (in game). The later looks more promising as engine should
    know its limits. The best way to split is by blend indices, but if that gets boring/complicated I could always split
    using geometry.
  3. I apply resulting pieces to AnimatedModel each on the same Node, which allows to control everything from
    first component.

@cadaver @Modanung @Sinoid - does it look good?

I tried to split in blender using additional geometry by using different material for different pieces,
but that produced very buggy result, so it have to be separate meshes.

What I want to achieve here is not some kind of character with parts of body replaced,
but more layered approach, where clothes are layered on top of body. This approach allows nude/semi nude options
and is more flexible in general.

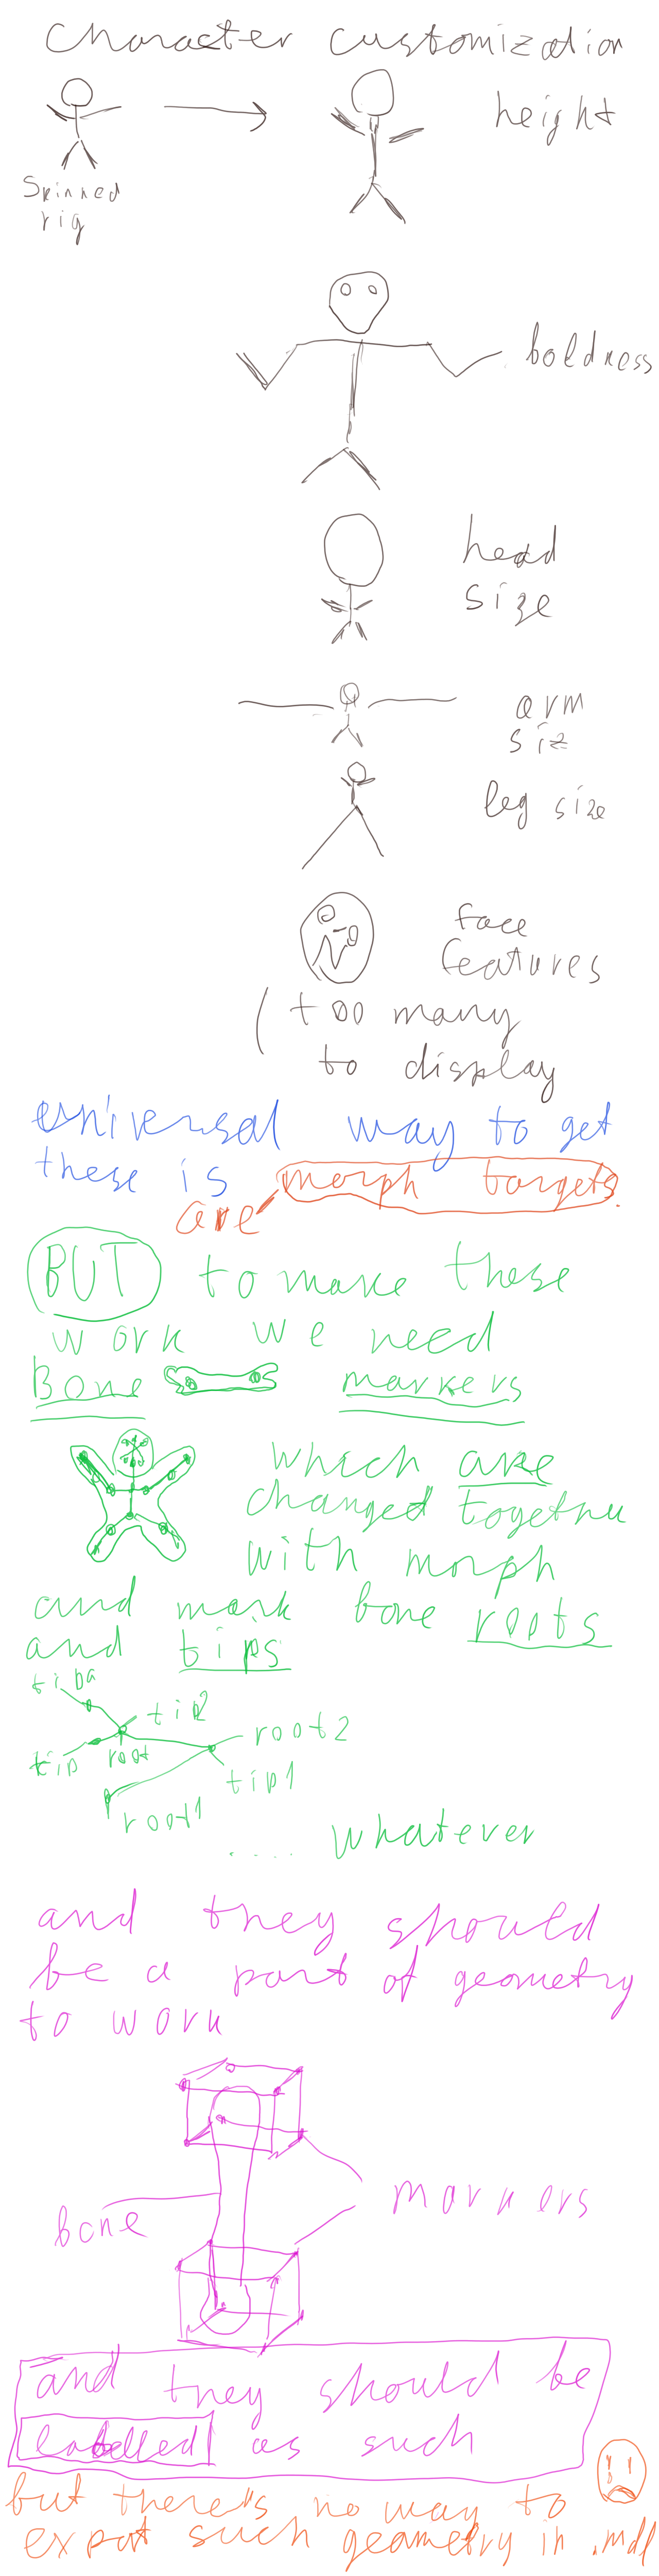
I use makehuman Default skeleton, the one with complex face structure (which I lake as it helps making
facial gestures even for me which is neither animator nor character designer). As I found most
flexibility I look for is in face area, but I also want macro parameters (height, head size, boldness, fatness
also changeable).
When I look at examples it is more into either SR2-4 character customization or Japanese games like AG3
character design options. So it is not like character is built of bricks, but more of shape, i.e. you not
just select body type from a set, you morph one to other, so you can have fine-grained control.

So it looks like I have the following challenges to overcome before this becomes true:

  1. 20/64 bone limit overcoming - as I plan addition of hair and clothing rig (and hair physics if somebody will help me do this), I will get to 200+ bones on the skeleton, which will require some automatic handling. So
    I will need a way to effectively autosplit models or some other great ideas (I tried Unity and UE4 - models with 300 bones work great there on GLES2 type hardware - how?).
    ( this is what I currently struggle with )

  2. I will need to rebuild skeleton according to all morphs. Just fine-tuning stuff in code according to morph values will
    become boring and I don’t want boredom in hobby project so I will need markers exportable via Blender as part of mesh. These should be morphable by morphs too. I can just model internal cubes as Makehuman uses and move them together witm morphs. These should be placed at root of each bone. I will be able to find bone rotation by
    consulting parent cube position, so that should be doable with plain loop over all bones. The only problem is tiip of “leaf” (no child) bones, but this can be handled by special tip cubes.
    The problem is I currently don’t understand how to access such data from Model, as these will be individual named
    vertex groups without bone associated. @cadaver - is it even possible?

  3. As this only done on character customization, not on actual game play, the result should be saveable in some way
    so that save data will not grow too much. Any ideas on this? Carrying .mdls through all game saves doesn’t make me happy…

  4. Performance - as we will have quite a lot of batches per character (for 200 bones we will have 10 meshes for
    only a body in worst cast, not including clothes) I will want only close characters (a limited number of them) to have
    such details, especially in case of crowds. So a set of LOD versions of a character should be creatable
    using the same metadata. So we need a few versions of original mesh with simplified skeleton, and have full set
    of similar looking morphs on them (where necessary) so creation process will create full set of meshes.

Any ideas where to look farther?

slapin

Looks like this topic is not interesting to much of the audience, but thinking in self-centric way and to keep the topic up
for interested people I’d update.

I started writing a function in AS which splits Model into a set of Models which comply to bone limit.
I loop through Geometry and split IndexBuffer as soon as enough diferent blend weights are collected.
The code looks extremely complicated, I wonder how I could simplify it.

Now I need to split VertexBuffers as splitting IndexBuffer is not enough.

Modanung

Well I am following your progress. The reason I don’t have a lot to say is that you are beyond what I did so far with character creation. I never exceeded the max number of bones and only used morphs for random characters/birds without stretched skeletons.

Does saving a list of deform values and recreating the model at startup make you happy? :slight_smile:

slapin

Well, I’d say it would make me happy if that will ever work. It looks like a problem is complex enough
that I can’t cope without help of others. There’s a lot of questions that arise every moment.

  1. I don’t understand the actual mechanism limiting number of bones. I tried the following tests,
    and I don’t quite understand the results. First I tried to have model with single VertexBuffer for 10 geometries,
    containing 200 bone weights (i.e 200 bones). Each geometry had a portion of VB set in draw ranges. The problem
    was the same as with single geometry, which means that won’t help. However, if I use separate Model and separate VBs, everything works like intended. I wonder if there is some in-middle possibility to have single .mdl and still get
    the required result (animatable model with 200 bones).

  2. I wonder is there some simple mechanism to split models except for processing individual bits in
    IndexBuffer and VertexBuffer? The process of recreating model is quite time-consuming and brain-exploding :frowning:
    Also AngelScript doesn’t have access to many model bits like morphs so I don’t even know if that can work.
    I’d look at some code examples for Model processing… And please don’t sugest dynamic geometry example -
    I work with these resources for so long, that I would consider this offensive trolling.

slapin

I wonder why these models work unmodified in Unity and UE4, what is the magic?

johnnycable

Bone limit is for gl es 2, if i’m not mistaken.
Single mesh bone limit, gles 2 / dx9, circa 2007. or so.
They work in unreal because you’re probably using gl3+/dx10+
Change gl version you’re building against in urho.
There’s a special version of reattiva export somewhere which export more bones per model.
Import options from command line importer allows you to import more bones.
Or so I think.

slapin

well, it is not dependent on GLES but more in number of uniforms. And GLES3 limit is 128 bones
for Urho which is still too low.
And my model with 176 bones work fine in UE4 GLES2 exports. I think it is something
more about software than hardware.

slapin

As mesh splitting fixes the problem, I think something could be done inside engine to represent
mesh so that it will work, so the result will be the same as with mesh splitting.
Or I can write special mesh loader in my code nobody will see. I think which idea is more attractive…

slapin

Well, I think nobody got an idea of what I want… Lets add some illustrations…

slapin

And about fundamental problem with customization (actually second problem counting from bone limit)

Sinoid

Looks like this topic is not interesting to much of the audience, but thinking in self-centric way and to keep the topic up

No, you just went off into rebuilding Poser/Daz, so there’s not exactly a lot to comment on.


Don’t the exporters/assimp-converter already deal with splitting?

You really don’t want to do that. You want to have bone weights for every vertex ahead of time. Calculating bone weights is incredibly slow even using the sloppy Bone-Heat method, Bone-Glow is even slower, and voxel-methods have the woes of voxels.

Bone weight calculation is slower than trying 10,000 different chart layouts for UV maps. This I know as I do both, automatic UV charting and automatic bone weighting.

Picking up the existing weights from a surface isn’t much a problem, because you’d just LL^T them through the rest of the mesh via Eigen.

slapin

Well, many people do this even in indie projects, so I think that all should not be too complicated.
I do not plan rebuilding Poser/Daz, I just want to gracefully handle macro morphs on character.

And no, neither assimp nor epxporter do handle model splitting AFAIK.

I do not plan to recalculate bone weights, I just want to move joints when body is scaled.
That should keep weights valid.

slapin

Well, I think exporting additional vertex group is not a problem, a problem is putting it inside .mdl file.
As this should work together with morph, it should go with model… Or I could just save custom .xml with vertex indices,
having custom group for each model. I wonder what is best approach…
@cadaver @reattiva - any ideas?

slapin

Well, I think of pipeline like this.
I think markers can be set as different material and be connected to cubes,
which will effectively save them as different geometry. Also distance to root of each bone can be used to find which
marker belongs where. This should be doable. Probably some assimp-based tool could be implemented to do this and save xml or json with indices.
Second problem is how to apply morphs in software and get the resulting point data. This is probably not too hard to do. And then the resulting mesh should be split (together with morphs which remain not applied) or the data should be copied (+morph data) to pre-split meshes. I wonder how to do this step. Should be some trick.

hicup_82017

Hello,
I am interested with 300 bones :slight_smile: from this big gigantic thread.
All I find is Slapin, trying to break his model, so that he can get lower bone count, which will make it under
cSkinMatrices[MAXBONES] , where for opengl ES2 is 64.

How my use case is relevant?
I just had a dream to animate a max of 2 human characters at a time in my game, but wanted them to look lively.
A . Can I approach this problem like this?
A.1 Theory:
All I understand is Uniforms.hlsl in which cSkinMatrices are used, will be used once per draw call. So all it aims to finish per draw call, shall be limited to 64 bones.
A.2 Approach:
Can I just fake my input model as different materials, if the model has more than 64 bones (this will not be a mesh splitting, So no abnormal skinning weight issues). For example in this case of 300 bones, I could fake my model as 5 different materials.
A.3 Why I want to do this:
A.3.1 I believe for every different material, a separate draw call will be used, Came across in unity google.
A.3.2 I believe I will have Max of 2 Models in my game.

A.4 Problems I see:
line 2231 in AssetImporter.C, if (model.bones_.Size() > maxBones_) it was designed to throw an error.
Will different materials be treated as different models?

Disclaimer: Some of this might be terribly wrong, considering my practical experience with animation world is very limited (just 2.5 months :slight_smile: ).
My target of game would be mobile platforms with OpenGLES 2.0

hicup_82017

@Sinoid ,I just noticed that AssImp actually supports, mesh splitting by maximum bones specified. But this was not used in Urho3D --> Tools/ AssetImporter.cpp.

Did any one had information, regarding this option being tested in Urho3d?

/** This step splits meshes with many bones into sub-meshes so that each
* sub-mesh has fewer or as many bones as a given limit.
*/
aiProcess_SplitByBoneCount = 0x2000000,

I guess this option would ease bone limitation part, if one has to go with more bones.

slapin

Hi
Thanks for find. I use Blender so I’d prefer splitting model in exporter. Or (which I think would be best) in engine,
as engine actually knows how many bones it can use. But even AssImp solution would be great to have.

Also I was never able to use materials to make bones work - only full mesh split works.